This modestly elaborate Property Investment Comparison Spreadsheet calculates cash flows, investment returns, equity, and other financial effects of an investment property. I am not an expert in financial math and I do not guarantee any sanity in the calculations.
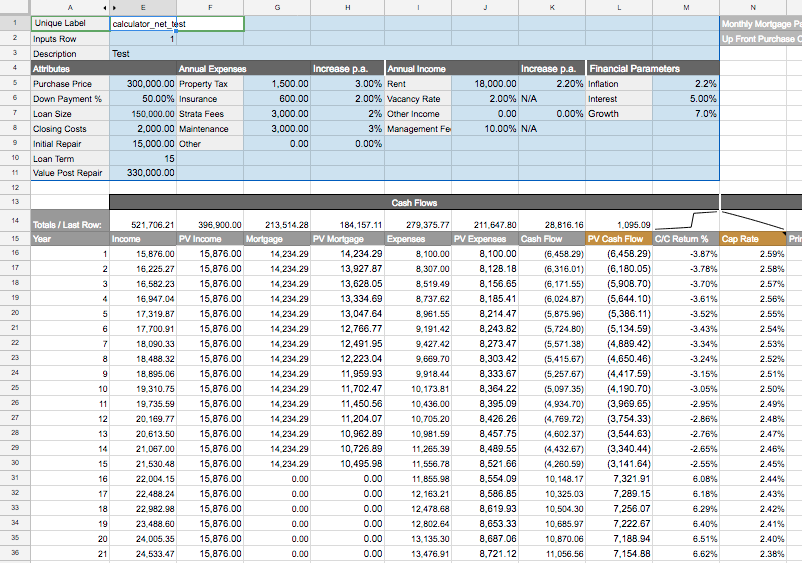
Property Investment Comparison Spreadsheet.
Get the latest version here: Property Investment Comparison Spreadsheet
Please! Comment below to tell me how this has been useful to you, and give me your feedback. Happy investing :)
Update March 24, 2018
I decided to bite the bullet and get the gooseneck professionally redone by Pro-tech Yacht Services. I inspected the work today and I think it looks really solid; see below for yourself. Pro-tech, like many is a custom rigging shop that does both big and small projects. Their work is in demand, so it took nearly 2 months for them to begin work on it, but that seems to be typical for the “top shops” like this one.
Hopefully I’ll be testing it all out on Easter weekend!

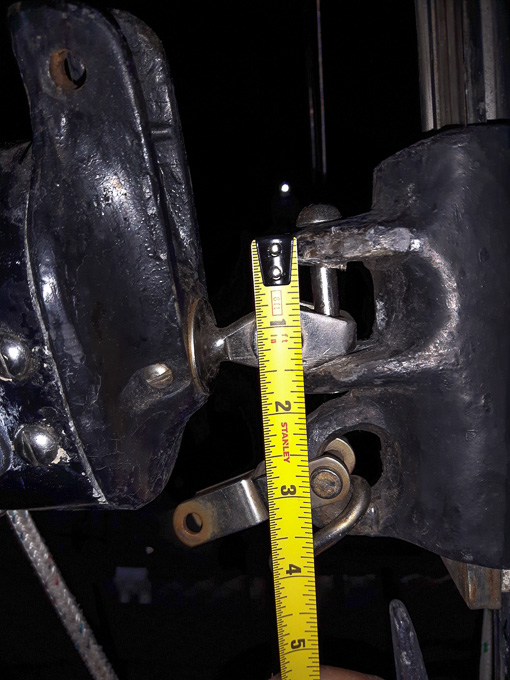
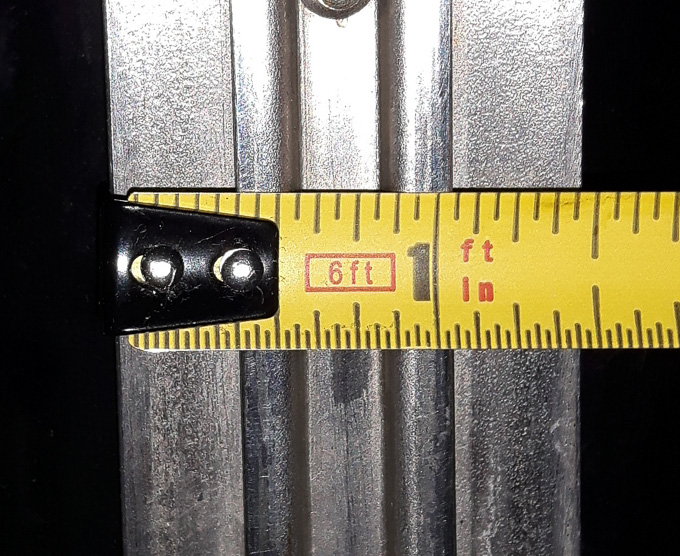
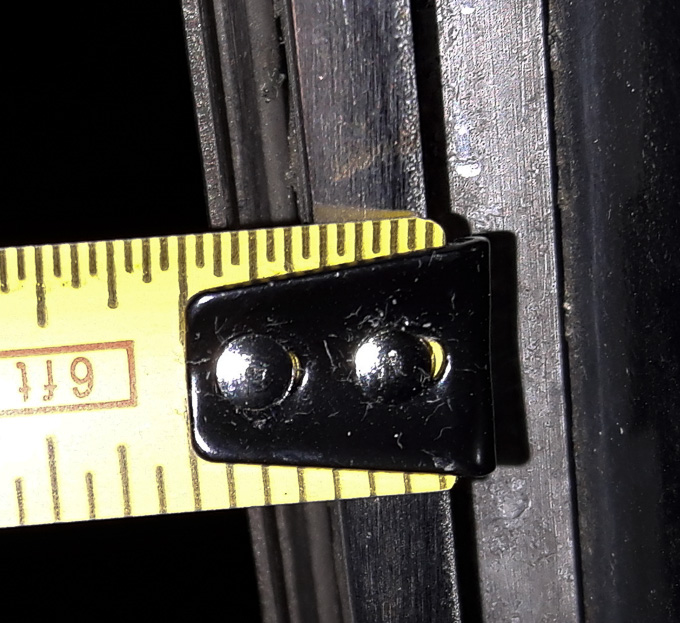
Gooseneck slider height 4 1/2in.
Original Post
I am replacing a few parts around the gooseneck of my Newport 30 Mark 2 (a.k.a. N30ii, Newport 30 mkii, Newport 30-2, and the Gary Mull design) and will be logging information about that here. My boat has fairly good maintenance records and as far as I know all this stuff is original to the Newport 30-2.
The main motivation is that the gooseneck slider is bent, and may be cracked, but it’s hard to replace one part without either spending a lot of effort and/or money, or replacing the parts around it too. I want to avoid having too many patchwork upgrades, so I’m also going to replace the toggle, and maybe the boom end cap along with it.
Half the battle is identifying what I have, and so, in hopes of helping other Newport 30-2 owners, I have documented my measurements of the gooseneck assembly here.
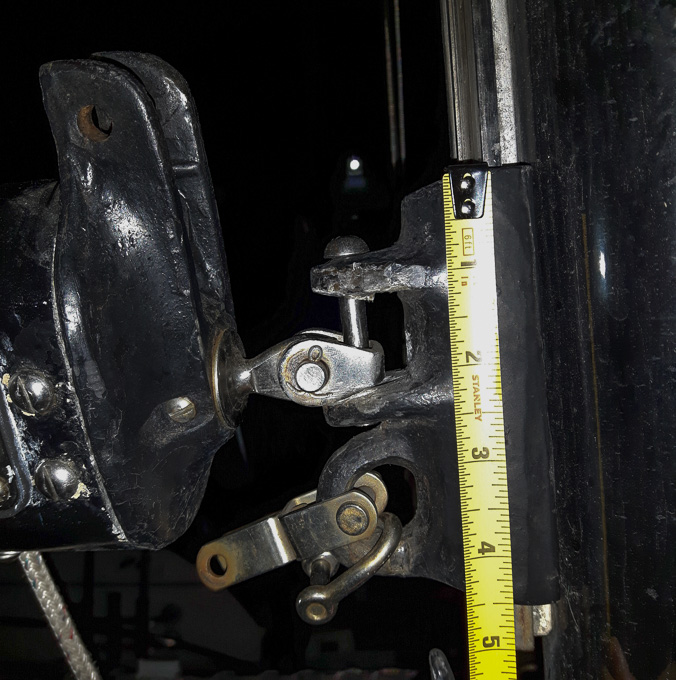
Gooseneck slider height 4 1/2in.
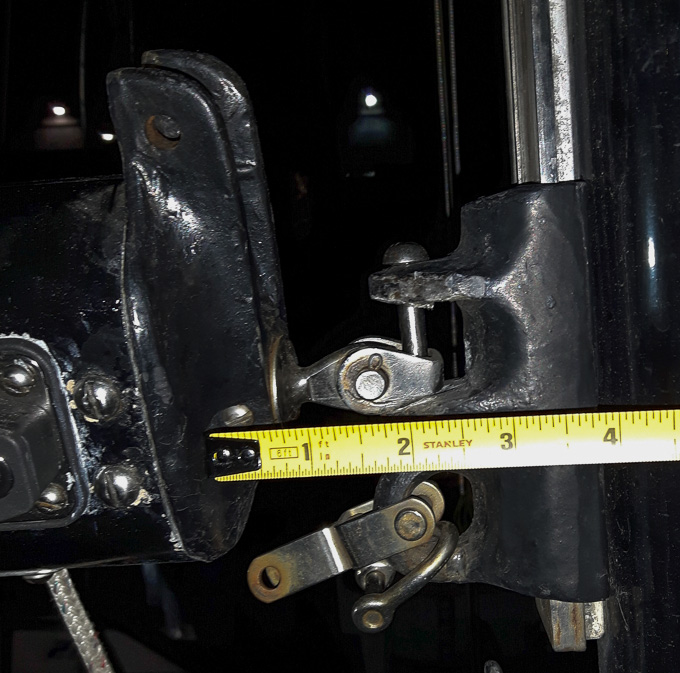
Gooseneck Slider Depth approx 2in.
Gooseneck slider maximum toggle height approx 1 1/4in.
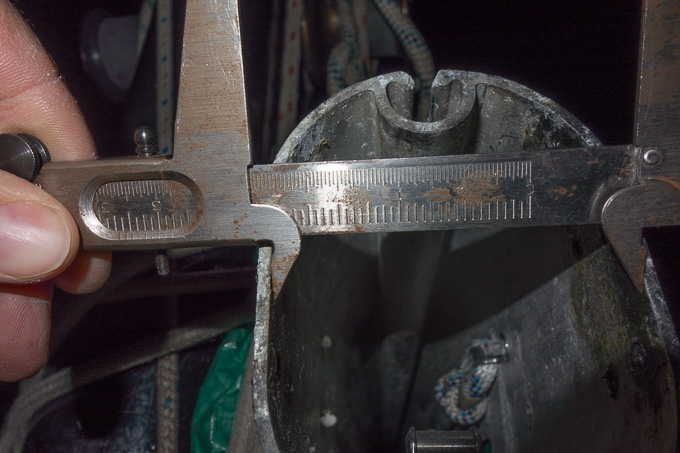
Slider track width 1 7/16in or 1 1/2in.
Slider Track Depth/Thickness 1/4in.
There is a sheave for the topping lift that comes into the boom on the bottom at 2 3/4” from the end. That limits how deep the end cap can be.
Related is the spar section, of which I took a few measurements and pictures as well.
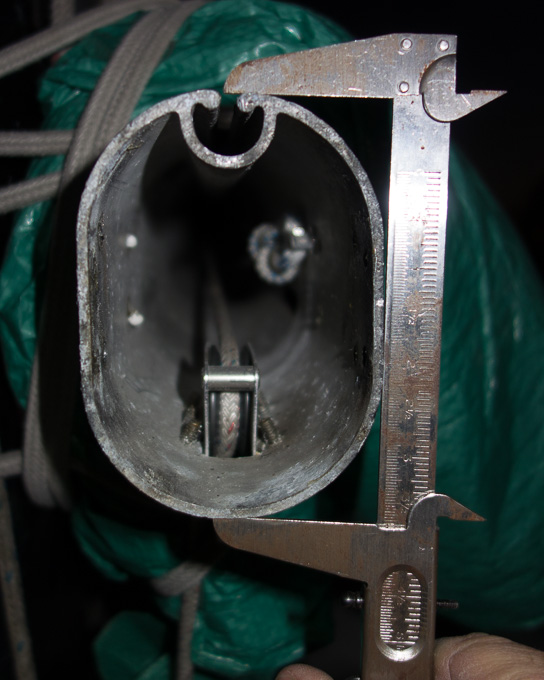
Spar section outside height 4 7/16in.
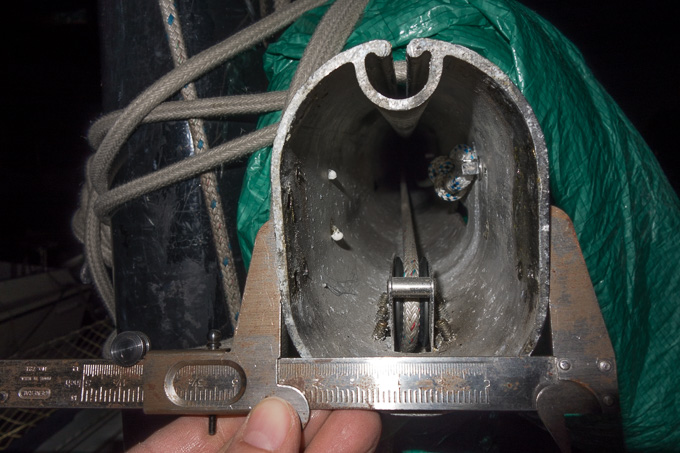
Spar section outside width 3 1/8in.
Spar section inside width 2 7/8in.
In addition to photographing direct measurements, I traced the spar section and labeled it. The drawing is done on metric graph paper, where each square is 0.5cm. All measurements are written into the figure, including the following:
- The sail track’s inside diameter is 3/4in,
- The sail track’s outside diameter is 3/4in,
- The sail track’s outside height is 13/16in,
- All walls are 1/8in,
- The screw holes appear to be 1/8in and 3/16in.
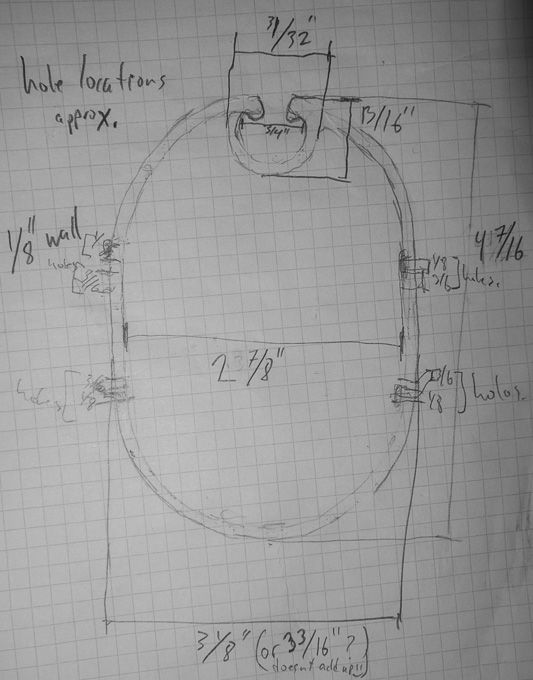
Spar Section Sketch.
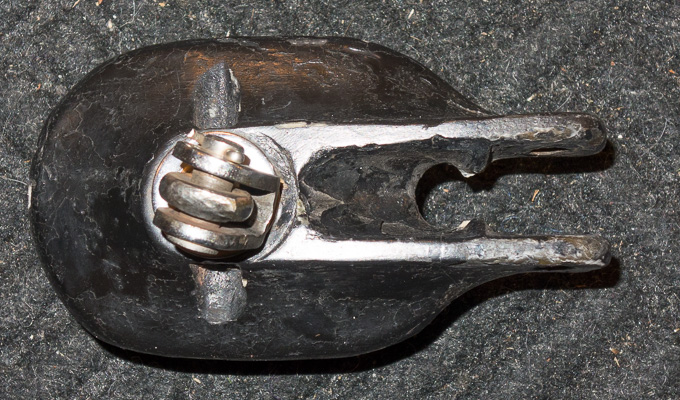
The end cap that fits onto the spar section appears to be made of the same cast aluminum alloy that the gooseneck slider is made of. Bolted into that is either a chromed brass or stainless steel toggle-and-bolt assembly, which I have thus far found impossible to remove (have not tried heat yet). The end cap came off rather easily once I removed the 4 screws holding it down, including those passing through cheek blocks (don’t overlook them like I did!) and applying heat with a regular propane blow torch on a cold day. Rather than prying under the lip of the end cap, I tapped with a lead cannon ball on a long wrench passed through a gap in the cheek of the boom.
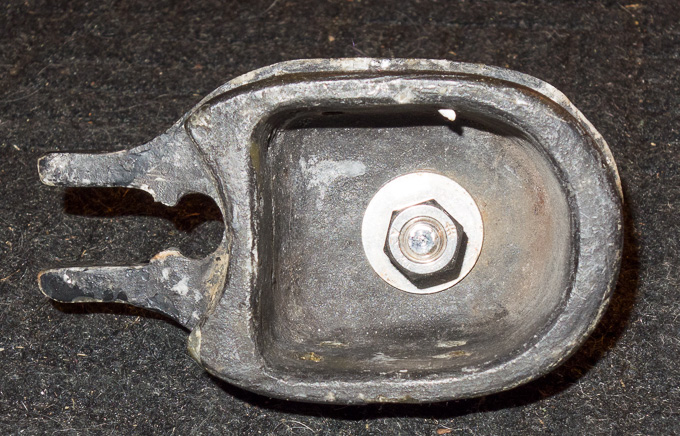
End cap inside.
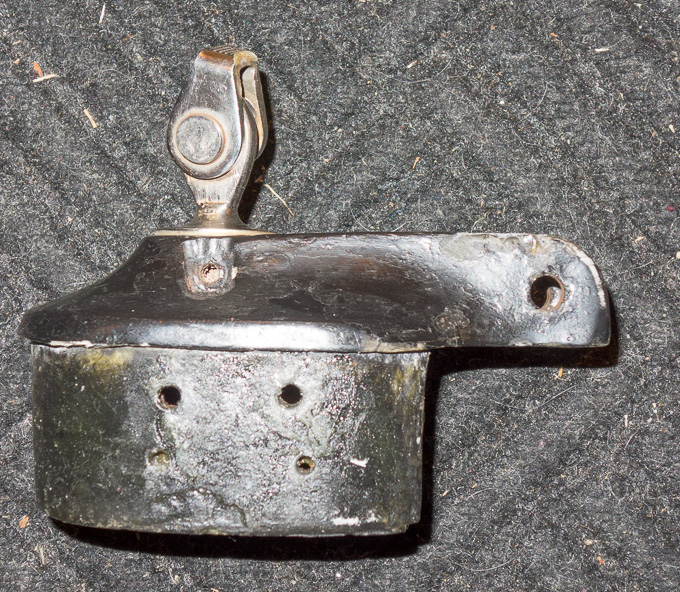
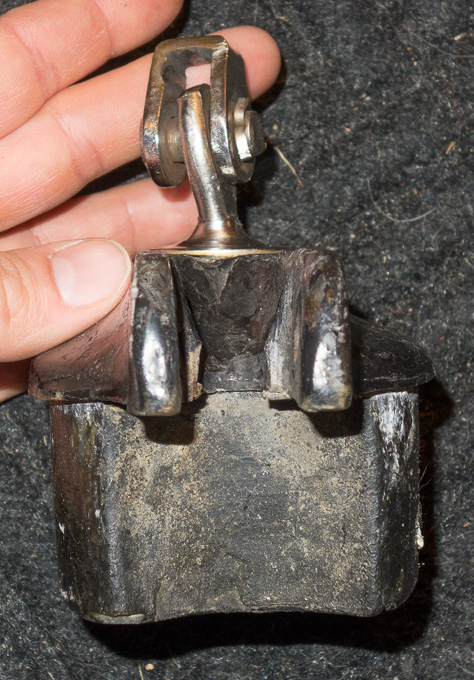
End cap profile.
End cap front.
End cap top.
From this point forward I didn’t have my trusty analog imperial caliper handy, so the rest of the measurements are either metric, or decimal imperial.
I also traced the end cap fitting onto the metric graph paper, and sketched the lip and sail track parts. The measurements are written into the figure, including the following:
- End cap fitting width 7.0cm (2.880in)
- End cap fitting min height 8.3cm (3.532in)
- End cap fitting max height approx 3.79-3.81in
- End cap fitting dpeth 1.677in
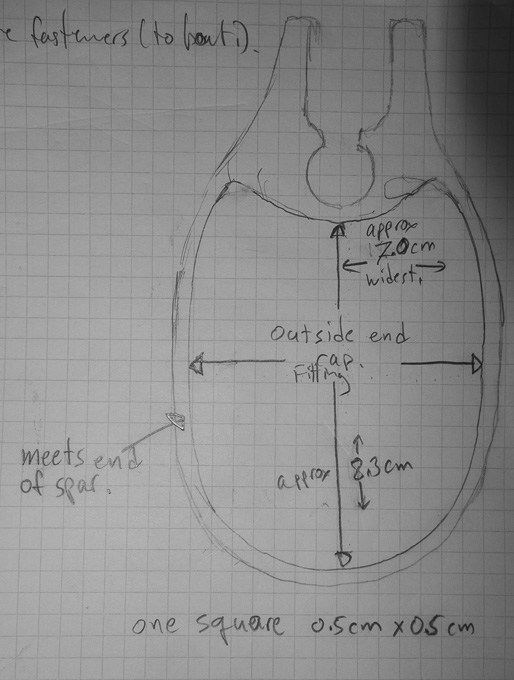
End cap fitting sketch.
A vertical toggle pin attaches the gooseneck slider to the gooseneck toggle, and the toggle attaches via eye-bolt pin to an eye-bolt made fast to the end cap. The bolt appears to be seized with adhesive, as well as held on with a lock washer and nut and perhaps lock-tite.
- Toggle pin diameter max approx 0.3in
- Eye-bolt pin diameter 0.369in
- Eye-bolt pin length 0.904
- Toggle outside width (i.e., the distance the eye-bolt pin has to cover) 0.773, inside 0.471 (i.e., the distance that bounds the width of the eye)
- Eye-bolt flange diameter 1.184
- Eye-bolt diameter 0.39
- Eye-bolt nut 0.675
- Eye-bolt eye protrusion distance 1.387
Edit: Roverhi points out in a comment that it looks to be a LeFiell boom, and indeed LeFiell has one with the same spar section. Probably more to the point is that the existing gooseneck assembly is inadequate and likely not complete.
Here is a copy of their spar sections, taken from LeFiell’s old website and used without permission. It’s pretty clear to me that I won’t be getting any OEM parts for this, so we’ll have to see what’s next.
LeFiell Spar Sections
A little randomness can yield remarkably organic images. The JavaScript snippet below randomly assigns colours to pixels, row-by-row starting at the top, such that the colour is similar to that of other pixels close to it.
Try the Random Canvas generator yourself.
Remember: Each new image you generate has NEVER been created nor seen before. If you like it, then drag it to your desktop! If you make a really nice one, or if you like this, leave a comment.
Press the buttons to generate a new image. Drag images to your desktop to save.

The JavaScript snippet
I conceived the idea and wrote the snippet in 2012 and both are released under a CC 3.0 Attribution Non-Commercial license.
function newDrawing(cwidth,cheight){
    var c=document.getElementById("myCanvas");
    var ctx=c.getContext("2d");
    var id=ctx.createImageData(cwidth,cheight);

    var i,iw4 = id.width*4, iw2 = id.width*2, iw = id.width;
    id.data[0]=Math.random()*255;
    id.data[1]=Math.random()*255;
    id.data[2]=Math.random()*255;
    id.data[3]=255;
    var dir,mv;
    var j;

    //change this to change the amount you move in each colour
    var amount = 10;

    for(i = 4; i < id.height*iw4;i+=4){
	//alpha
	id.data[i+3]=255;
	for(j=0;j<3;j++){
	    if(Math.random() <= 0.5){dir = -1;} else{ dir = 1;}
	    if(Math.random() > 0.95) mv = 1; else mv = 0;
	    id.data[i+j]= id.data[i+j-4] + amount*dir*mv;
	    //Math.max(0, Math.min( 255, id.data[i+j-4] + (0.5 + Math.random())*dir ) );
	    if(i>iw4+4){
		if(i%iw2 > iw || Math.random() > 0.6){
		    id.data[i+j] = ( id.data[i+j]+ id.data[i+j-iw4+4]+ id.data[i+j-iw4-4]+ id.data[i+j-iw4])/4 + Math.random() - 0.5;
		}
		else
		{
		    id.data[i+j] = ( id.data[i+j]+ id.data[i+j-iw4+4]+ id.data[i+j-iw4-4]+ id.data[i+j-iw4-4])/4 + Math.random() - 0.5;
		}

	    } else if(i >= iw2+iw && i < iw4 && Math.random() > 0.99){ //in the first row we want to come back to the first colour
		id.data[i+j] = ((iw4-i)*id.data[i+j] + (i-iw2-iw)*id.data[j])/iw + Math.random() - 0.5;

	    }
	}
    }
    ctx.putImageData(id,0,0,0,0,cwidth,cheight);
    var img = c.toDataURL("image/png");
   // window.location = img;
    var imagepng = document.getElementById("image");
    imagepng.src = img;
    var button = document.getElementById("save");
    button.onclick = function () { window.location.href = imagepng.src.replace('image/png','image/octet-stream');};
}
How the Random Canvas works
Think of a digital image as a grid of pixels, and each pixel has a colour
![]()
In this image, each pixel is a similar colour to the one that is left of it (or the rightmost one in the row above). How do we get similar colours?

To get from to we subtracted 2 from red, added 2 to green, and subtracted 2 from blue.
To get the whole image, we started by colouring the top left pixel and then we chose a similar colour for the next pixel by adding or subtracting a small amount of each colour, and so on , , , until we coloured all the pixels, row by row, ending with the last one at the bottom right .
We randomly decide whether to subtract or add a bit of red, blue and green, to make the next pixel a random colour similar to the last one.
But that isn’t quite the end of the story, is it. After all, the pixels generated by the buttons below are similar colours to the ones above and below themselves, not just beside. If we only did what I described, the results would look like this:

We fix this hideous behaviour by taking taking the average of two colours. After we have done the first row, we take our random choice of colour, and change it to the average of its own colour with that of the pixel in the row above.
![]()
We are almost done! You might have noticed that there are some wavy patterns that can’t be created by merely taking the average with the pixel above. These are done by taking averages with pixels above left, or above right, depending on how far along the row we are. They are just details that don’t really change the main idea.
It’s sugar cane season!
Chewing on stalks of raw sugar cane was a wonderful part of my childhood in Vancouver, and while visiting my home town today, I came across this delight once again. This time, however, I’ve made a delicious drink for grown-ups.
Simply mix sugar cane with rye whisky at a ratio of about 4:3.
The juice from about one section of the sugar cane should yield around 40ml of liquid, so this is enough for a single shot (30ml) of whisky. Chill the rye and the sugar cane. Extracting the juice from the cane (without chewing it) is a little challenging. I used a large heavy duty garlic press and it was considerable work. A conventional vegetable and fruit juicer would do it, I’m sure, as well as industrial cane juicers.
Enjoy the pictures and leave a comment!
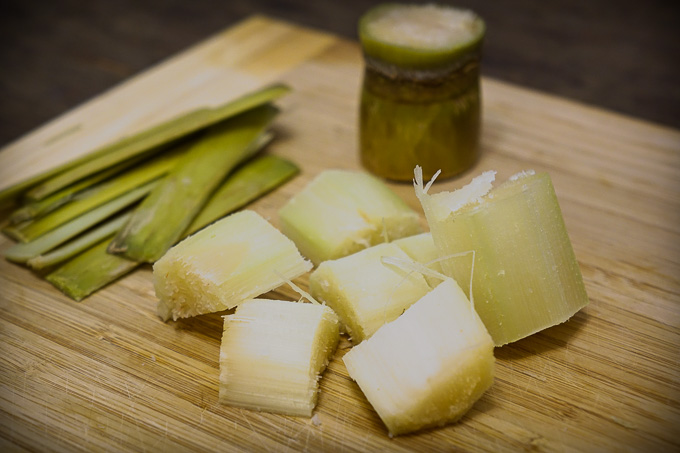
Sugar Cane Pieces
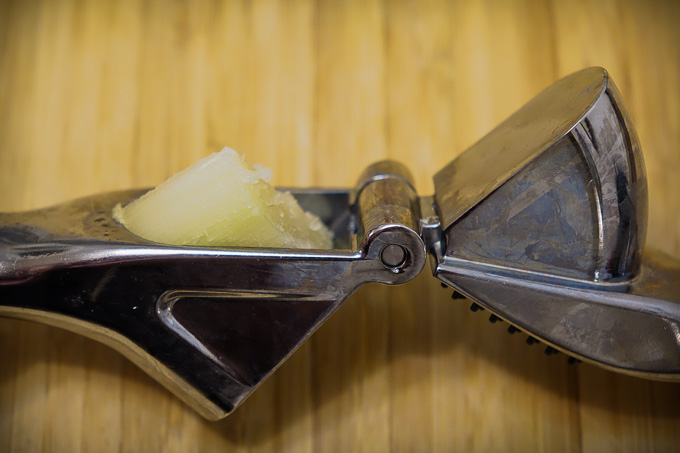
In the press
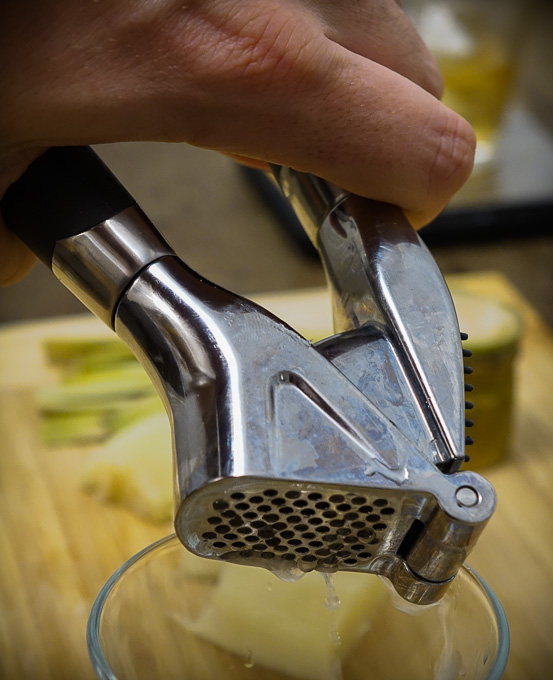
Pressing the Cane
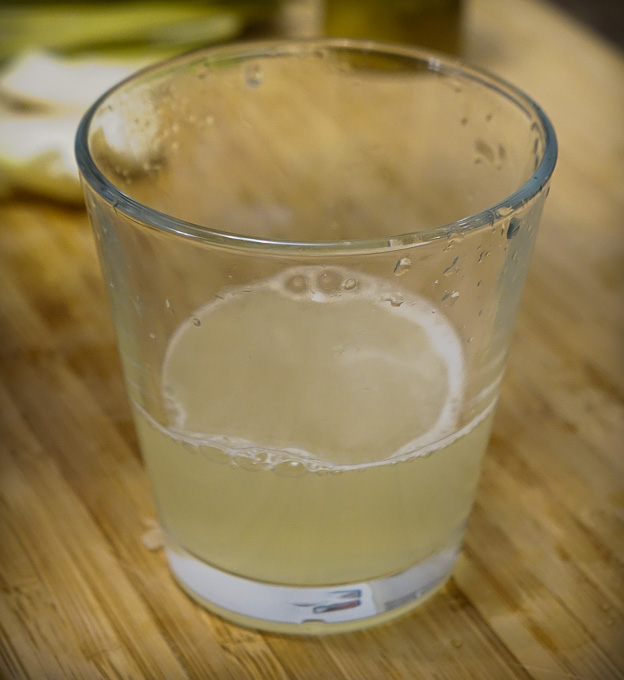
The Sugar Cane Juice Mixer
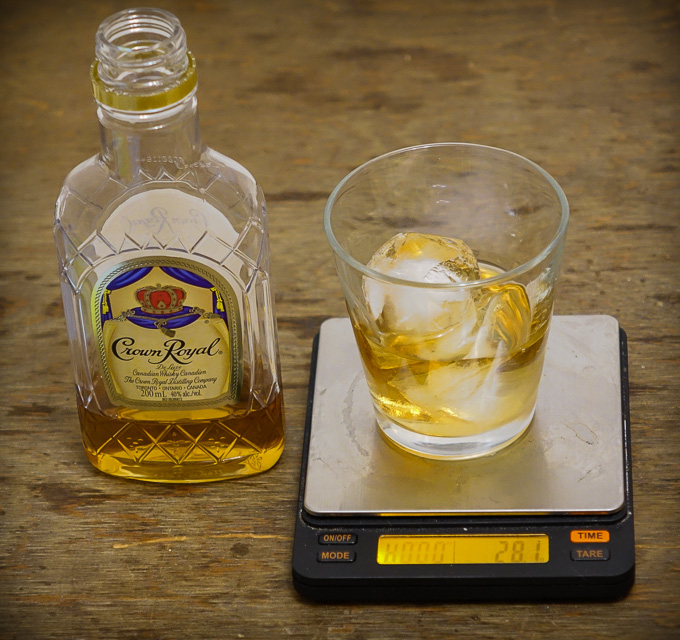
Crown Royal Canadian Rye Whisky (30ml weighs about 28g)
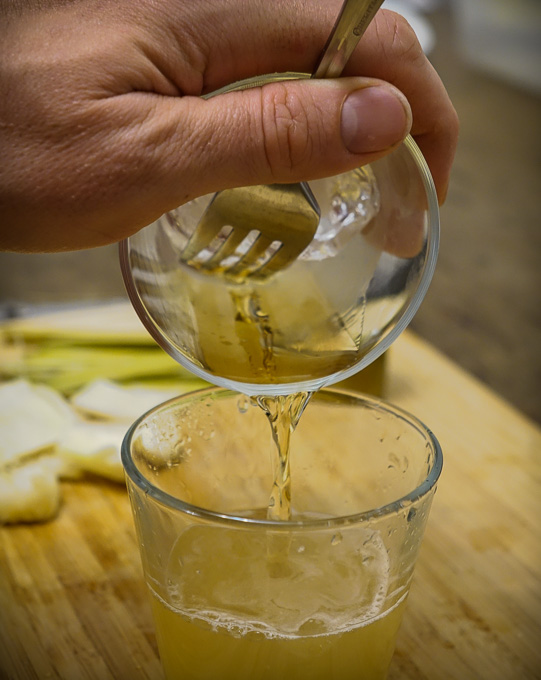
Mixing the Rye with the Sugar Cane

The Finish
Datacenters provide low-cost, efficient and flexible computing resources, so that users and applications (e.g., Google Search, Pokemon Go) share a pool of resources, and can expand into that pool as needed. Being such a critical building block of our digital world, every aspect of datacenters undergoes constant research and development both by industrial and academic communities.
At the physical level, all datacenters are built upon a network of servers, but there are many variations on exactly which hardware is used, and the topology (or graph) of the interconnections. A particularly interesting design is the server-centric datacenter network (SCDCN), for several reasons: it encourages the use of very cheap, and even legacy, components; many network topologies are possible; it allows the incorporation of existing, and extensive, research on high-performance interconnection network topologies; communication within the datacenter is fully programmable within the servers, making it an excellent platform for independent and academic research and development. Our work is precisely on algorithms for such communication, called routing algorithms.
Before I go on, let me describe how we model SCDCNs as a graph. An SCDCN with N servers and N/n switches, each with n ports, is represented by a graph on N server-nodes and N/n switch-nodes, connected by links. Each server-node, switch-node, and link represents the corresponding physical component of the topology. I’ll avoid excessive formality here by dropping the “-node” part. For reasons detailed in the paper, there are no switch-to-switch connections.
Many DCN topologies can be defined recursively, where a level k network is built from a number of level k-1 networks that are connected to one another with a number of bridge links. In our research we use the recursive structure and the bridge links to yield efficient routing algorithms for recursively defined networks. We apply them to two well-known SCDCNs that were proposed by Microsoft Research, DCell and FiConn,
We show, via an extensive experimental evaluation using our flow-level simulator, that our newly-proposed routing algorithms can yield significant improvements in terms of hop-length, fault-tolerance, load-balance, network-throughput, end-to-end latency, and workload completion time when we compare our algorithms with the existing routing algorithms for (Generalized) DCell and FiConn.
DCell, FiConn, and many other recursively-defined networks ship with a natural Dimensional routing algorithm, which is described for DCell below. Given a source server src and a destination server dst:
- Identify the smallest m so that a level m DCell contains both src and dst,
- Compute the bridge-link (dst’,src’) between the level (m-1) DCell containing src and the level (m-1) DCell containing dst,
- Recursively compute paths from src to dst’ and from src’ to dst; and,
- Piece together the recursively computed paths with the bridge-link.
It may be the case, however, that an alternative, proxy, level (m-1) DCell can be used such that a shorter path can be constructed from two bridge links and three recursively computed paths. An algorithm that searches for the proxy substructure is called a Proxy routing algorithm. This is precisely the situation depicted the the Figure below, for a level 2 FiConn that uses switches with 4 ports, where the proxy route is 2 server-server hops shorter than the dimensional route.
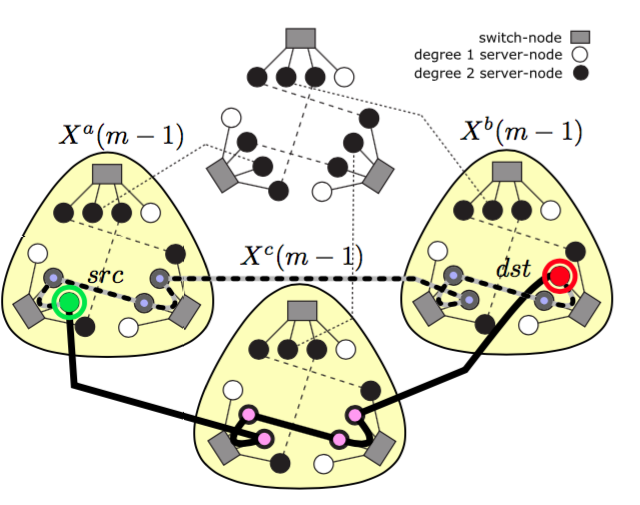
Dimensional route (dashed black-grey), with 7 hops, and proxy route (thick black), with 5 hops, highlighted on a FiConn(2,4).
In our paper we identify and evaluate efficient ways of searching for and identifying proxy substructures which yield short paths. It’s a bit technical, and the details are in the paper, but the basic idea is depicted schematically in the figure below. We restrict the length of at least one of the recursively computed paths by looking at the bridge links incident to nodes near src or dst, and considering only the proxies that those bridge links are connected to. We compute the length of the proxy path through each such proxy, as well as link-states (e.g., traffic congestion) along the path, and then output the best path.
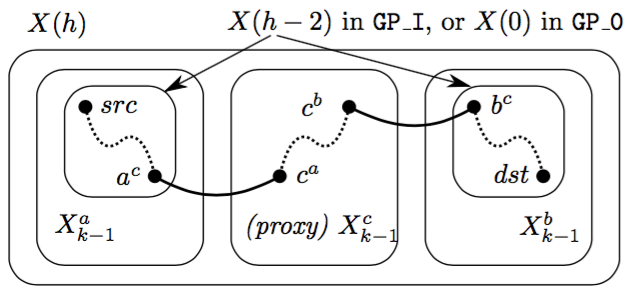
Strategy for reducing size of proxy search: exploit the structure of the network to choose proxy substructures X_{k-1}^c that are inherently close to src or dst. Substructures are depicted as rounded rectangles, where GP_I and GP_0 are two possible schemes.
The details are in our paper:
A. Erickson, J. Pascual Saiz, J. Navaridas, and I. A. Stewart.
Routing Algorithms for Recursively-Defined Datacenter Networks.
Submitted to a journal. Previous version in Proc. of
Trustcom/BigDataSE/ISPA, 2015 IEEE, 3, 84–91, 2015.